User manuals
- Cloud Computing User Guide
- Resources request
- VMs access
- Creating and changing VM Templates
- Creating a virtual machines
- Methods for adding VMs
- Creation of VM
- Changing the parameters of a running VM
- VM Cloning
- Creating a VM based on an existing template with a persistent image
- Creating a VM with a pass-through GPU card (GPU capabilities inside the VM)
- Specific parameters description
- Basic operations with the disk
- Using snapshots
- Saving disk images (backup disk)
- Creating and deleting a persistent DATABLOCK image
- Adding a volatile disk to the running VM
- Adding an additional network interface to the VM
- Creating a virtual network
- Adding an IP-address to an existing virtual subnet
- Modification of the model of a VM network device
- Cloud Storage User Guide
Cloud Computing User Guide
To work in the cloud, the a user must be authenticated by that the service successfully. The detailed information on this topic is presented in the section «Start using the cloud».
Resources request
Initially a user does not have any resources and, therefore, he cannot create virtual machines (VMs). To get some resources, a user should send a resources request via a special web form « Resources request» located on the helpdesk site. To do this on helpdesk.jinr.ru, you need to fill in a resources request form (see the screenshot below) available on the following path: New query → Cloud service → Cloud computing → Resources request (Новый запрос → Облачный сервис → Облачные вычисления → Запрос ресурсов).

VMs access
Access to KVM-based VMs created from shared (publicly available) templates can be obtained either via VNC (including the Sunstone web interface) or via the ssh protocol.
VNC
To access VMs via VNC using the Sunstone interface a user needs to click on the «VNC» button located either in the right column of his VM list or on the panel on the «Information» tab page of the specific VM (see the screenshots below).

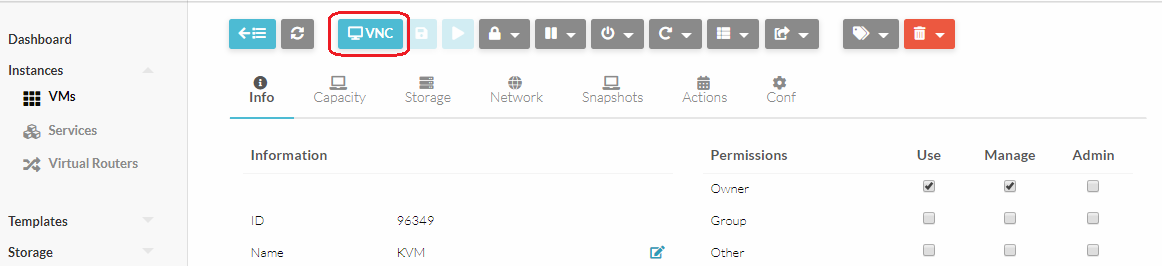
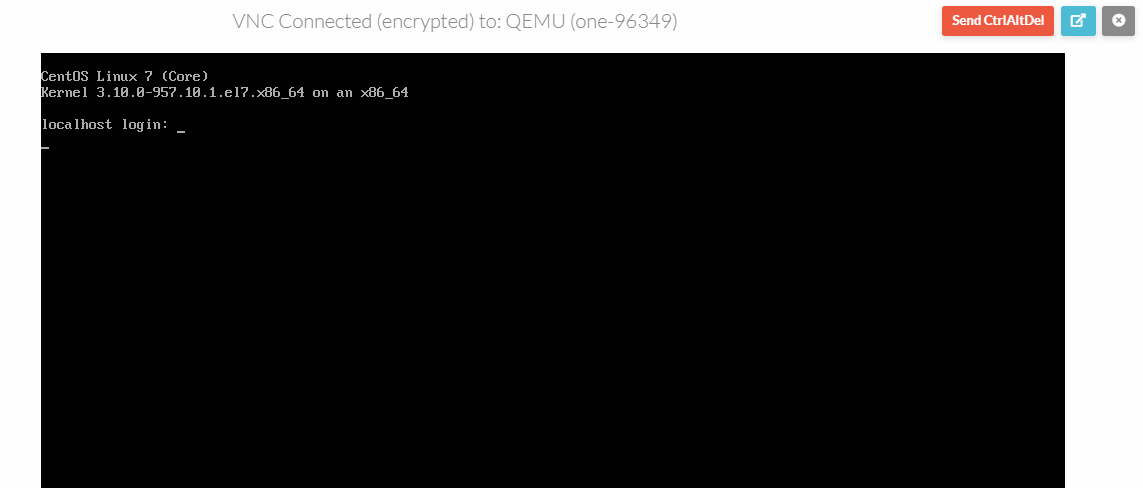
After connecting via VNC, the following window will appear and you can start working on a newly created VM:
Аccess to the service from other networks (outside JINR)
In order to use the cloud service outside the JINR network, you can use several options, for example, use VPN or set up a proxy connection on your computer.
This guide describes how to connect to the service using the x2go program. To start using this program, you should install the x2go client. How to do it for your system is written here wiki.x2go.org.
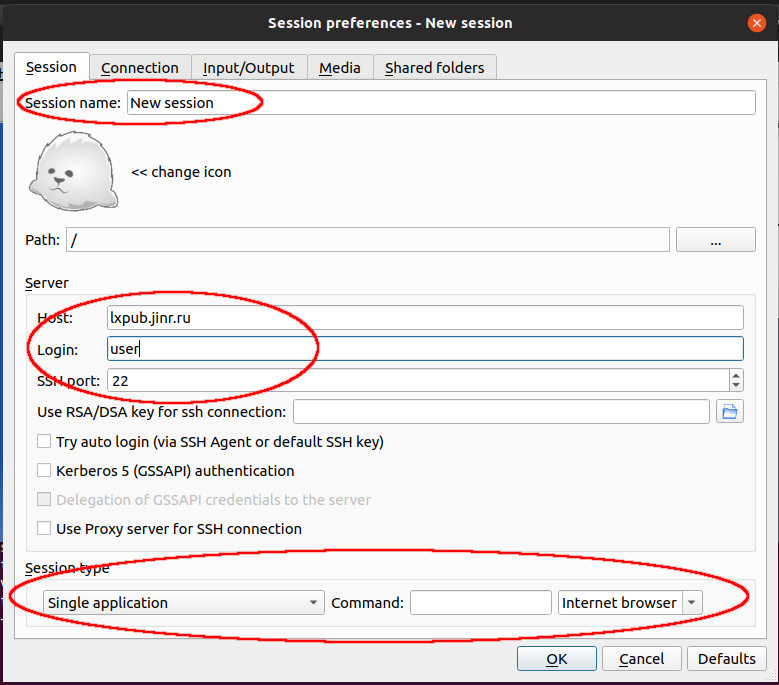
After installation, it is necessary to configure the connection. To do this, you should run the installed x2go client and create a new connection. In the window on the «Session» tab, you should configure the following parameters: Session name, Host (lxpub.jinr.ru), Login (the login and the password for the connection are used from the JINR account (login.jinr.ru)). Leave the SSH port 22, select the session type - «Single application» and the application «Internet browser» and click «OK».
Before pressing the «OK» button, in the «Input/Output» tab you can change the screen resolution with which the connection window will be opened. This is not a required option, but with the help of it, you can configure a more comfortable connection display.
To start the session, you need to click on the name of the created connection, enter the password and click «OK». A warning will probably pop up (because of the first connection); you just need to agree with it.
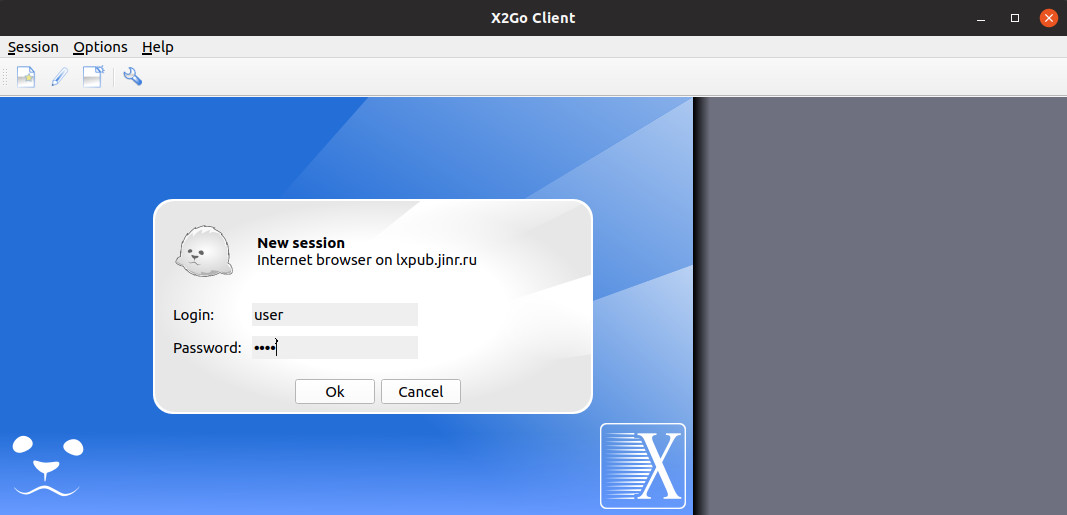
After that, a browser window, in which a user is granted access to the internal Institute resources, will open.
SSH
Password-based authentication
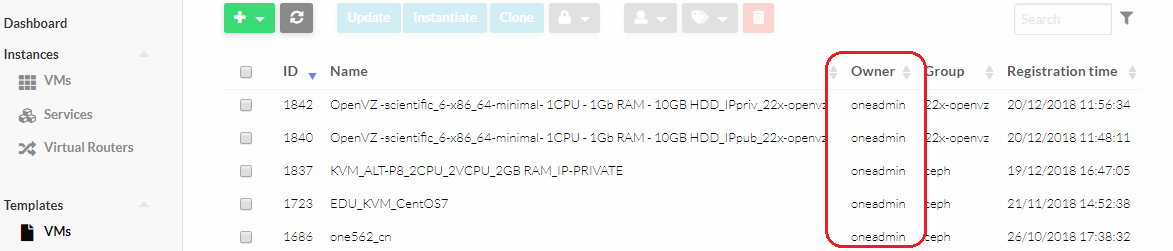
For access to a VM with the same user login and password that were used to log in to the web interface of the cloud infrastructure, VMs must be created on the basis of one of the public VM templates (the templates created under oneadmin).
Having logged in to a VM using an Institute account, to get superuser rights, you need to run the command «sudo su -» in the command line and enter the password from your Institute account again.
Key-based authentication
By default all user VMs with Linux OS created from public templates and having public IP addresses are available on the port 22 via the ssh protocol from JINR, CERN, NetByNet and TMPK networks. VMs with private IP addresses (such as 192.168.0.0/16 and 10.93.0.0/16) are available only from the JINR network.
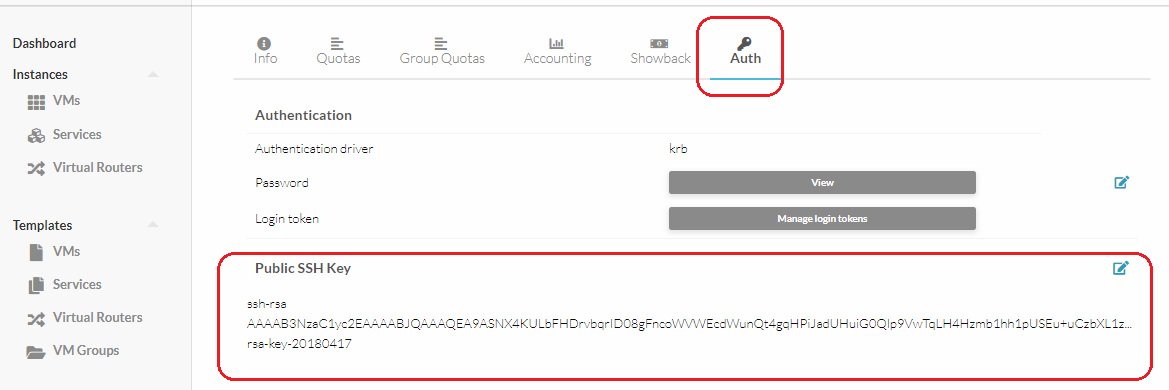
To access a VM under the root user using the RSA/DSA key, you should add your public key to the profile. To do this, click on your user and select «Settings».

Next, on the «Auth» tab in the «Public SSH key» field, place your public key.
Ssh key generation
To generate an ssh key in Linux, you need to performthe following steps:
In the console (terminal) enter the command:
- In response to the request «Enter file in which to save the key (/root/.ssh/id_rsa):» set the path to the private key or press «Enter» to use the default path ~/.ssh/id_rsa.
- In response to the request «Enter passphrase (empty for no passphrase):» enter the password to access the private key or press «Enter» to leave access to the private key without a password.
- In response to the request «Enter same passphrase again:» enter the password again or press «Enter» again for passwordless access to the private key.
As a result of these actions the directory ~/.ssh will be created if did not exist before, and public and private RSA-keys (files with the names id_rsa and id_rsa.pub, respectively) will be created in it.
The contents of the public RSA-key (i.e., the id_rsa.pub file) must be inserted into the «Public SSH key» field in the settings of your profile.

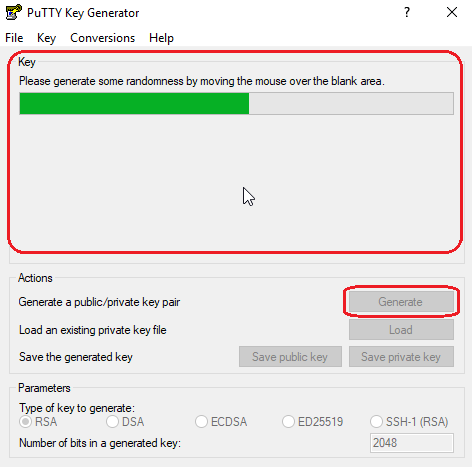
To generate an ssh key in Windows, you must perform the following steps:
Launch the PuTTYgen program (you can download the program from the link). Click on the «Generate» button. To generate a key, move the cursor to the empty «Key» field.
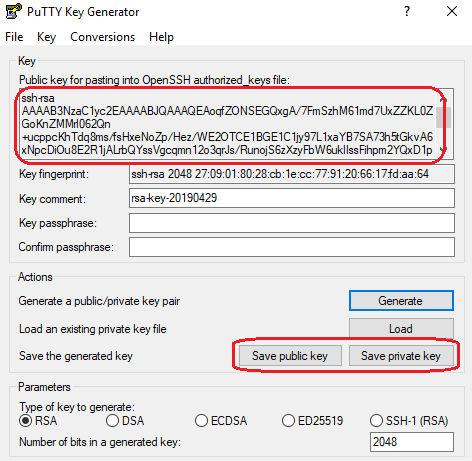
Save the keys on your computer. Copy the contents of the open part of the rsa key into the «Public SSH key» field in your profile settings.
Acsess to VM using ssh key
Linux:
To access a VM in the console (terminal) enter the command:
The connection to the server will be established. You do not need to enter a password.
Windows:
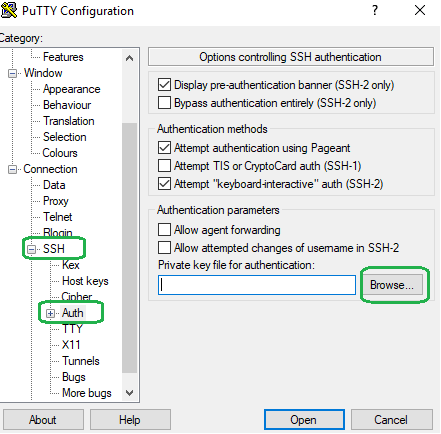
Head To access a VM you can use the PuTTY program (note that the computer was an English keyboard layout before you start).
To authorize using an RSA key, you need to add it to the program. Open the tab «SSH» and select the «Auth» box, click on the button «Browse».
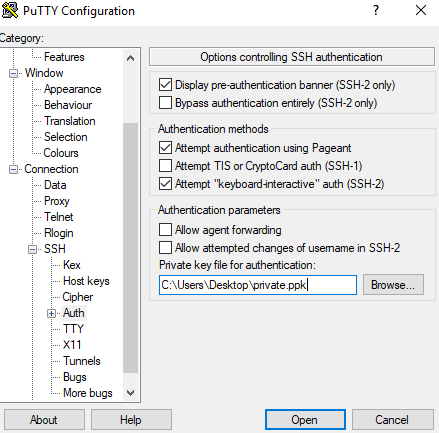
Select your stored private key (it should be added every time when you start PuTTY).
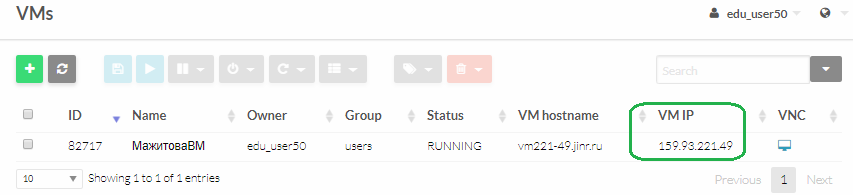
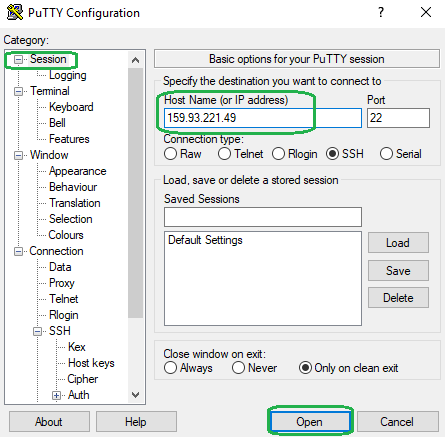
On the «Session» tab in the «Host Name (or IP address)» field, you need enter the IP address of your VM and click the «Open» button.
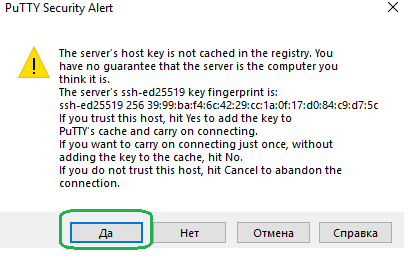
In the appeared window you need press the «Yes» button.
In the terminal you need enter the login «root» and press the «Enter» button. The connection to the server will be established. You do not need to enter a password.

Creating and changing VM Templates
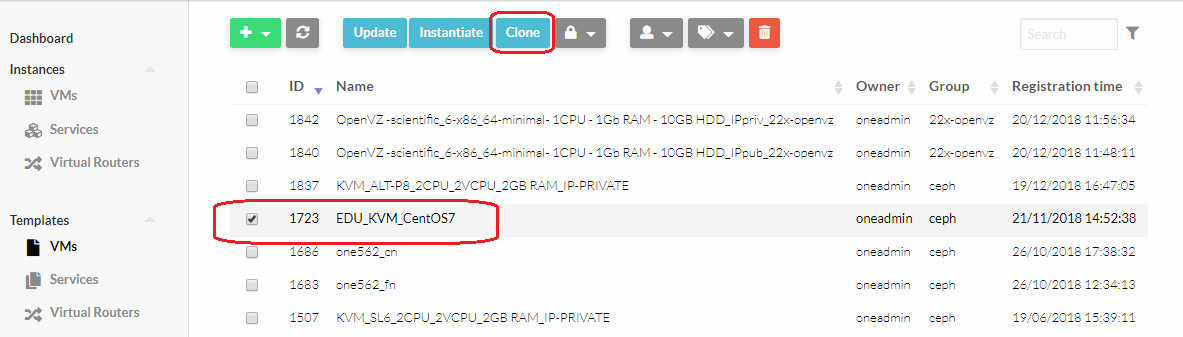
To create VM template, you can use any of the templates available in the cloud service. To do this, select the appropriate template and click the «Clone» button.
Specify the name of the cloned template and click the «Clone» button (if you select «Clone» in the new template, the same disks as in the previous template will be indicated, if you select «Clone from image», then copies of the images in the cloned template will be made. The new template will be substituted with the IDs of new (cloned) disk images, similarly, commands to delete templates and images will occur.


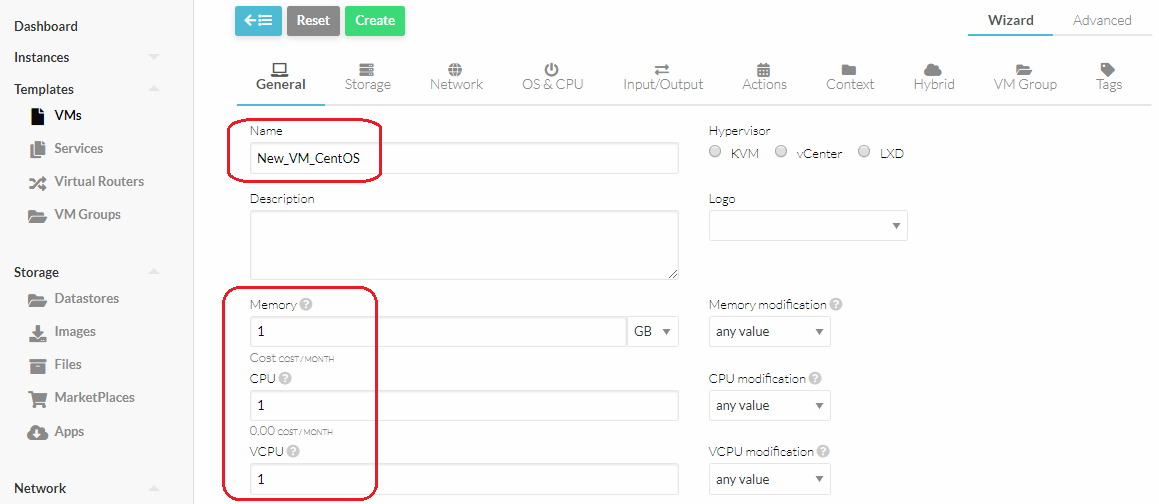
To create your own VM template you need open the VM Template editor. To do this, press the green «plus» button and select «Create».
The Template editor has 2 editing modes: «Wizard» and «Advanced».
The «Wizard» mode is used to set the basic VM parameters: CPU, RAM, DISK, IP address, etc.
The «Advanced» mode is used to set some specific parameters that are not available the «Wizard» mode, for example, LOOKUP_HOSTNAME or HOSTNAME.
To save a new template, click the «Create» button.
To edit the template and save it, you must click the «Update» button.
Passing through CPU from server to VM
To increase the performance of the central processor (CPU) inside the VM, including support for a wider set of instructions, the CPUs are thrown inside the VM. However, such a VM can only be migrated to a server with exactly the same CPU model (see link).
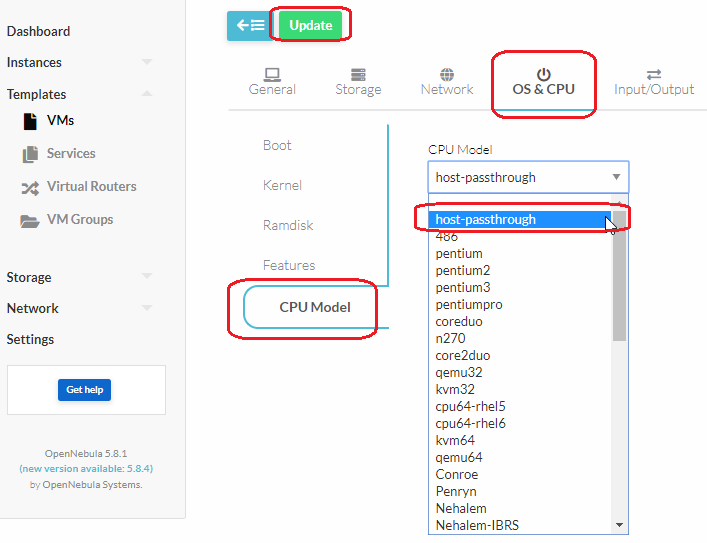
To forward the server CPU model inside the VM go to the «Templates» → «VMs» section, select the desired template and click the "Update" button.

Then, on the «OS & CPU» tab in the item «CPU Model», select «host-passthrough» from the drop-down list and click the “Update” button.
Creating a virtual machines
The information below assumes that the paragraph «VMs access» was read.
Methods for adding VMs
There are several methods for adding images to your cloud, namely:
- Using the OpenNebula application store (not recommended);
- Image request via HelpDesk (VM);
- Creating images in the OpenNebula environment.
Using the OpenNebula Marketplace
To download the image from the store, you need to go to the «MarketPlace», select «OpenNebula Public» → «Apps» (or select «Apps» right away).
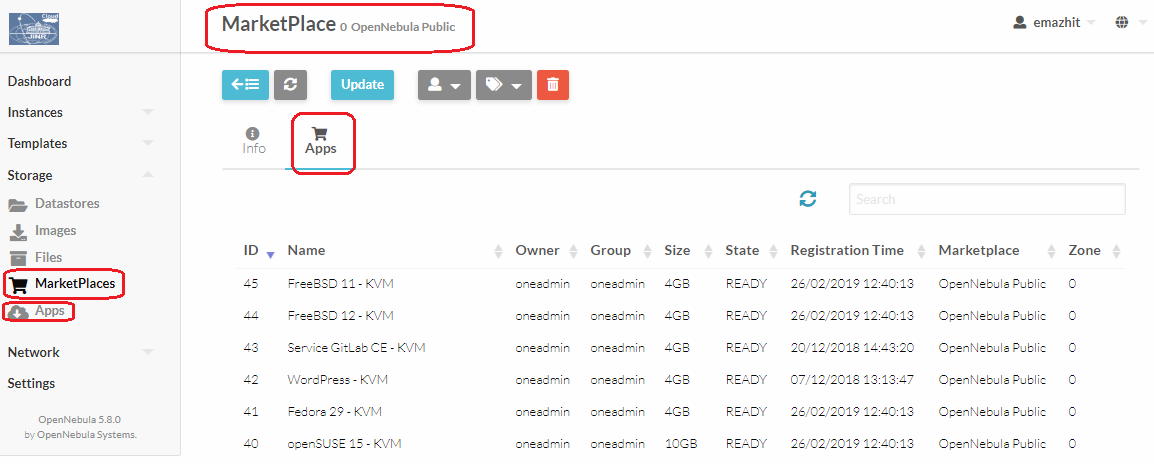
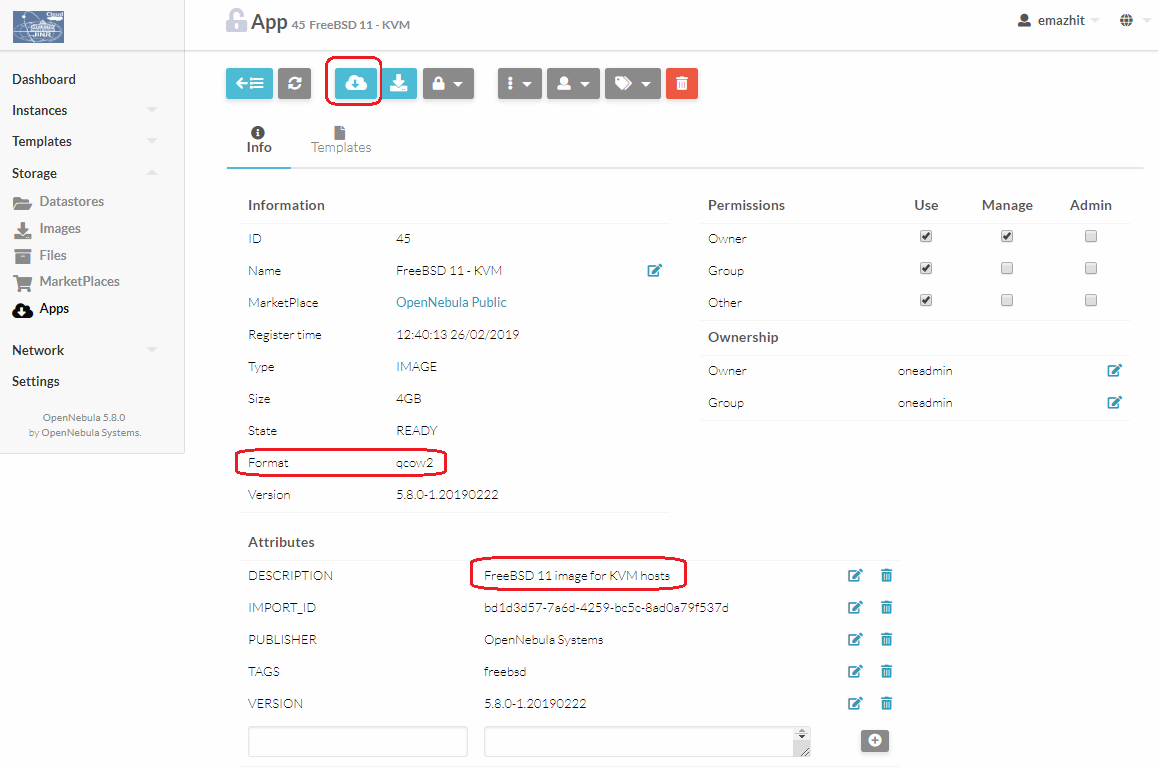
It is necessary to select a suitable disk image and a hypervisor type (KVM in case of the JINR cloud) from the list. Carefully read the description of the templates of ready-made VMs. These templates are provided and modified only by the representatives of the OpenNebula project. Download the selected image.
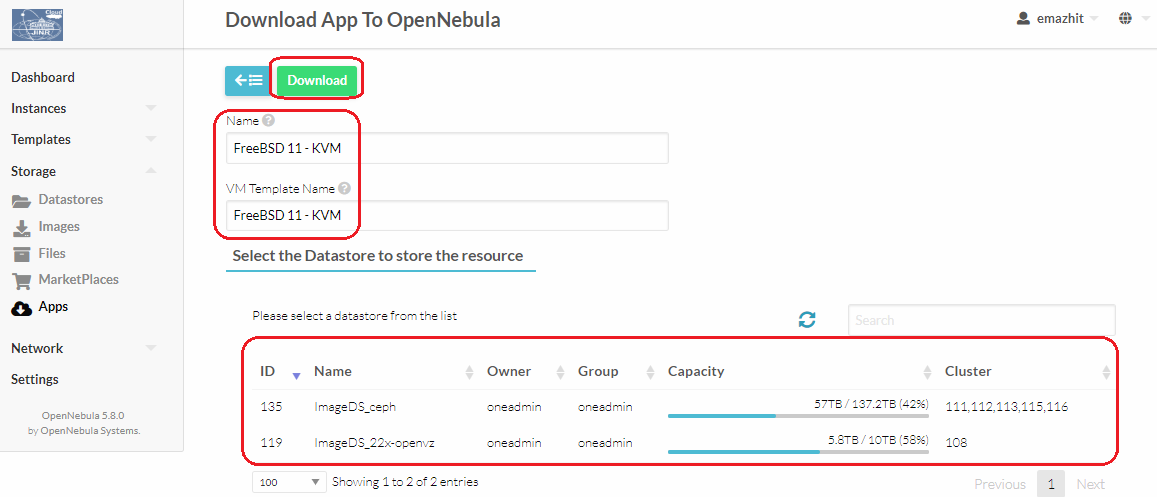
Further one need to select a datastore and assign the name for an image and a template. For KVM use the storage ImageDS_ceph.
Request of the necessary image through HelpDesk
If the image and/or the template with the required operating system is absent in the JINR cloud, then it is possible to send a request for reviewing via HelpDesk to get access to the necessary image / template, if they already exist in the cloud, or to ask to create one.
The request is created through the form on the HelpDesk website, in the section «User Support of the Cloud Service» (in Russian «Облачный сервис» → «Облачные вычисления» → «Поддержка пользователей облачного сервиса»).

In the request form, you need to indicate the identifier (i.e. login) of the user in cloud.jinr.ru, the name or image ID and/or template ID (if it already exists in the cloud and a user can see it but cannot use) or the name and version of the required OS, its bit depth and type of virtualization (KVM).

Creation of images in the OpenNebula environment
OpenNebula provides the possiblity for users to create the necessary OS image for KVM VMs.
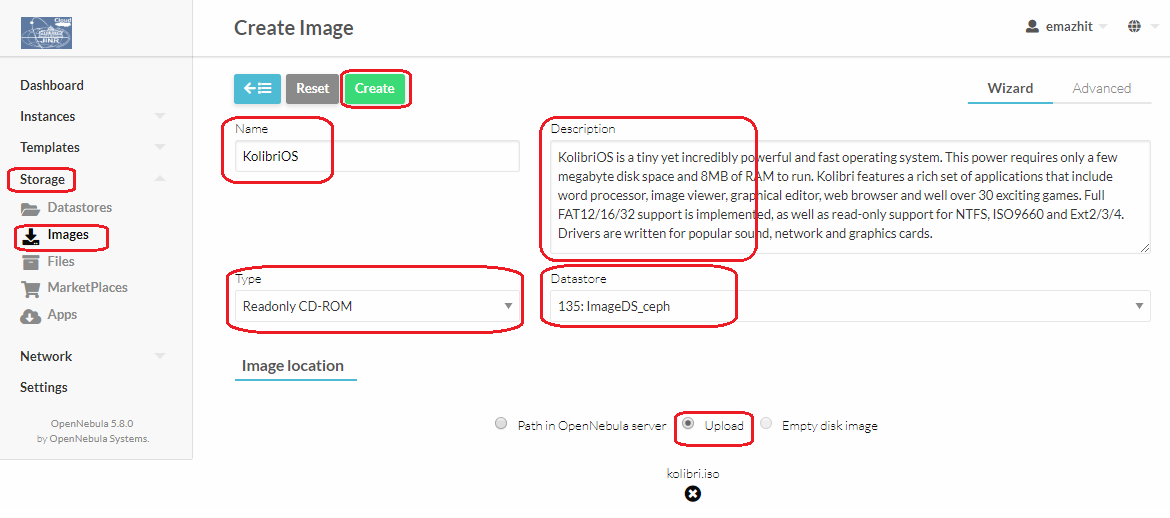
To create a new image, go to the «Images» section. Click the «plus» sign → «Create». Give a name, a description, select the type of the image «Read-only CD-ROM», the datastore «ImageDS_ceph», the image location «Upload», and specify the path to the file (.iso). Then click the «Create» button.
Create a DATABLOCK image, specify its size (for example, 10240 MB). How to create a DATABLOCK image is described in the «Creating and deleting a persistent DATABLOCK image» section.
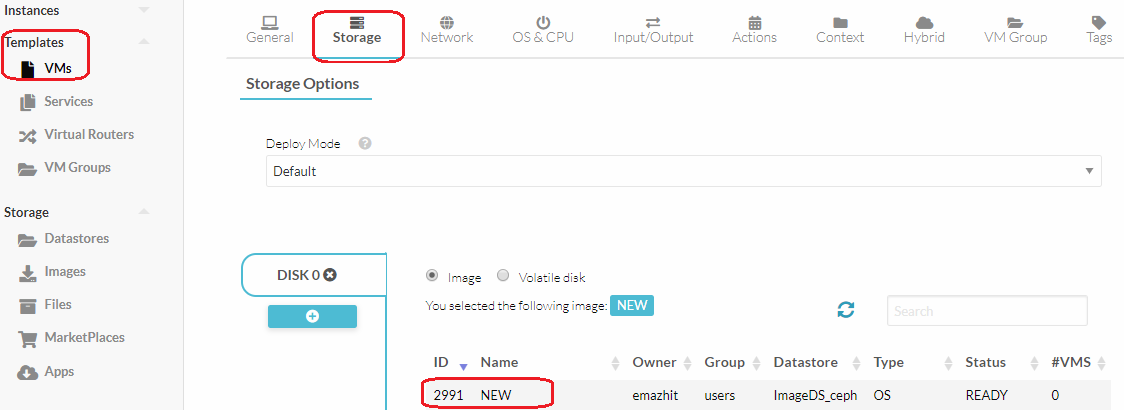
Pass into the section «Templates» → «VMs», further create a new template and configure the specified settings.
On the «General» tab, set the parameters of the machine depending on your quota.
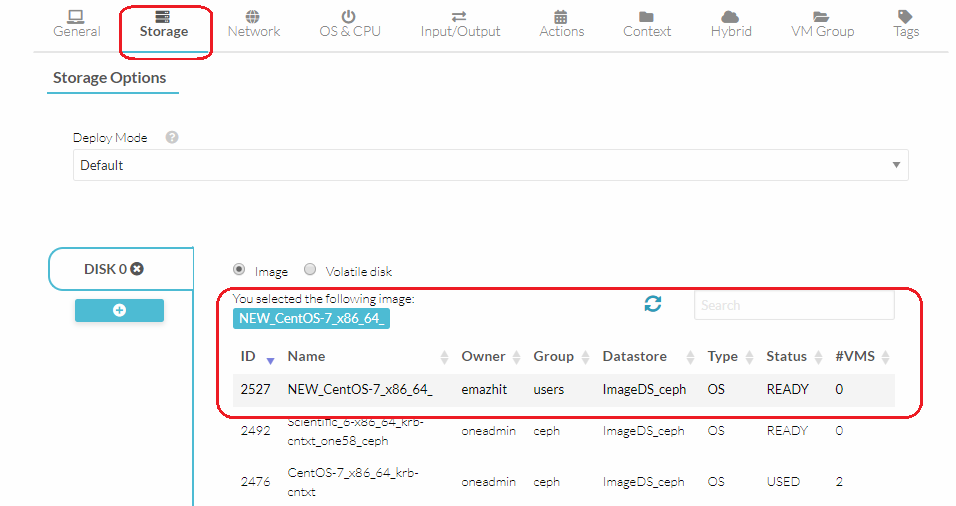
On the «Storage» tab select the earlier created empty DATABLOCK disk, add a new disk and specify your disk with the OS installer.
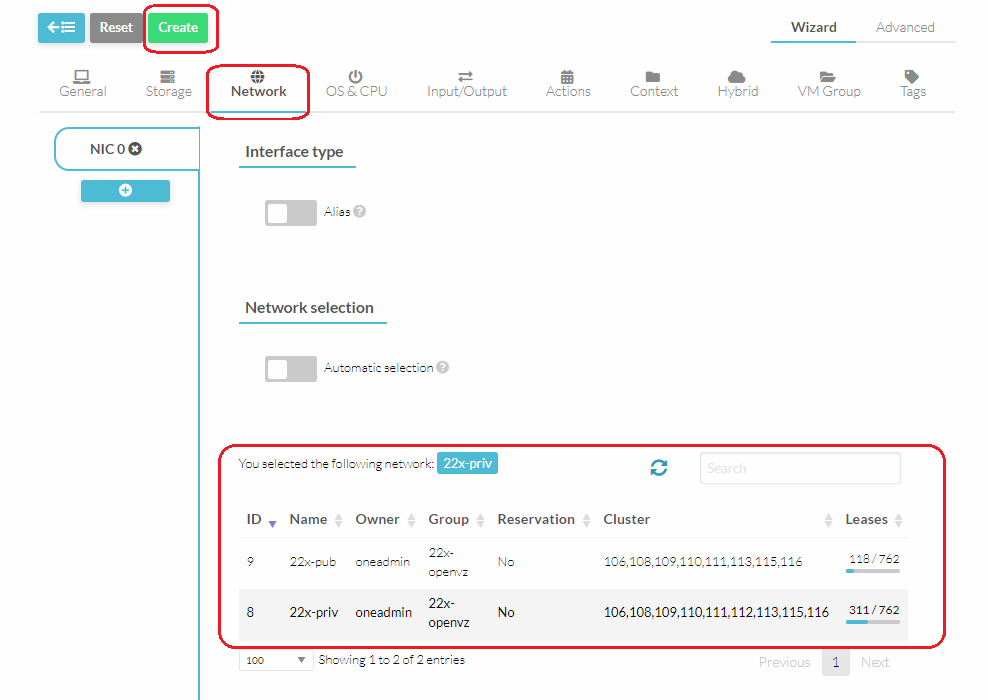
On the «Network» tab, choose a network (for example, «220-priv»).
On the «OS&CPU» tab, specify an architecture of the installed system, then set HDD as the first boot device and CDROM as the second one. Such a boot sequence will allow one to skip empty HDD during the first boot and boot from CDROM and then, when OS is already installed on HDD, the boot will start from HDD.
On the «Input/Output» tab, set a checkbox on VNC.
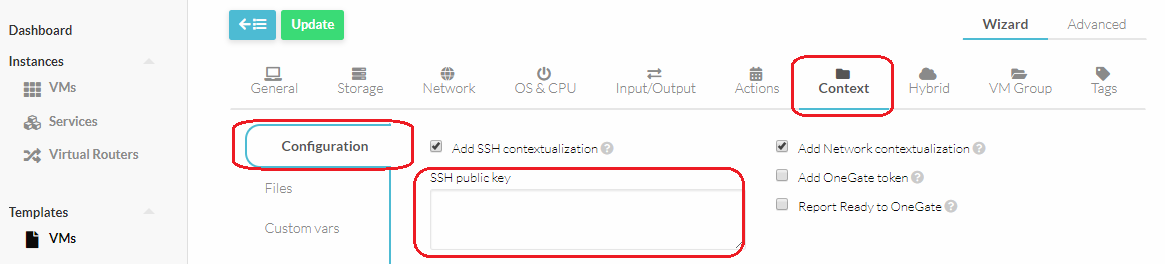
On the «Context» tab → «Configuration» copy the public part of the rsa/dsa key (.pub) to access a VM (how to access a VM is described in the «VMs access» section).
Launch the VM by selecting the created, configured template and connect to the VM through VNC. Continue the installation of the system in a graphics mode.
The description of creating as well as editing VM templates is provided in the «Creating and changing VM Templates» section mentioned above.
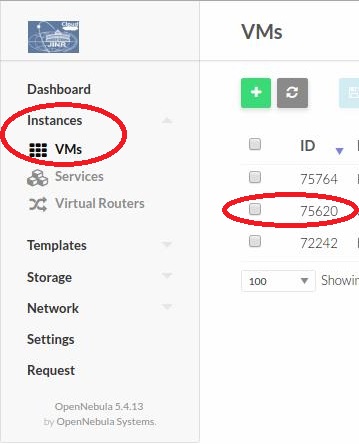
Creation of VM
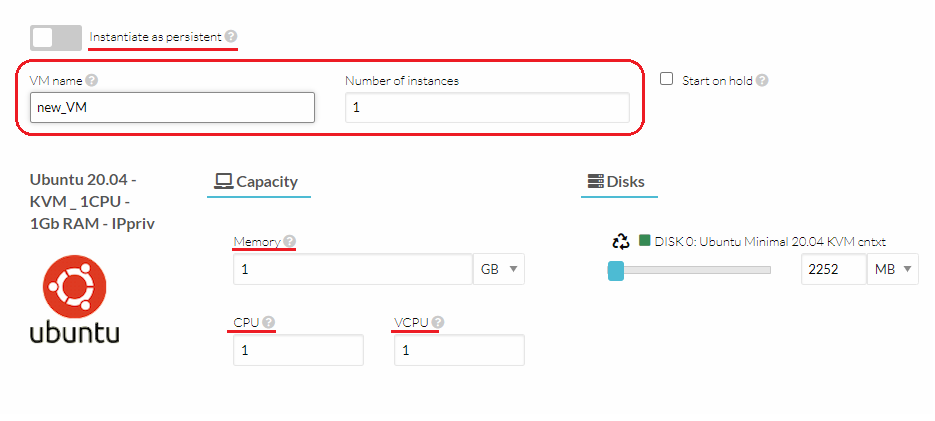
To create a VM in the section «Instances» → «VMs», it is necessary to press the «+» button, select a VM template. Specify the name and the number of instances created by the template. If necessary, configure other parameters like «Create as persistent» (make a permanent copy of the template along with all the added disks and expand it), «Memory», «CPU», «VCPU» (usually the parameters «CPU» and «VCPU» are equal, if there is no special need, it is better to make them equal), disk size (only for machines with the KVM virtualization) «Network», etc., then click on the «Create» button.

Attention!!! Resizing for a disk will work if opennebula's contextualization is installed on it and added to startup.
The operating system of the VM in the JINR cloud is recommended to be placed on a separate disk, and for software, user data, and other things, another separate disk should be used. It is not recommended to make the size of the disk under the OS large (practice shows that 10-20 GB is enough for most tasks), so that you can quickly backup the disk (saveas operation) and, if necessary, restore from the backup. In addition, in this scenario, the data / software disk can be reconnected to another VM, leaving the current VM in working condition (you must first unmount the block device corresponding to this disk). If it is necessary that all changes made to the disks (whether it be a disk with an OS or a disk with software / data) be preserved when the VM is turned off / properly deleted, the disk must be made persistent.
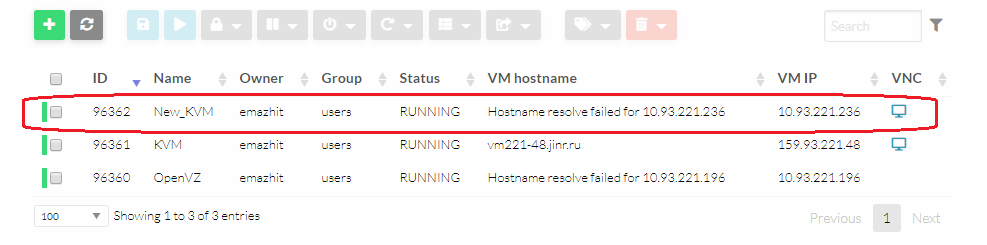
It takes a few minutes to get the VM up and running (see here for more details on VM statuses). As soon as the created instance gets the status «RUNNING», one can check its accessibility via the network by using, for example, the ping command:
Once a response is received, the machine is running and ready to work.

You can perform certain actions on a VM: save, start, block, suspend, stop, power off, undeploy, reboot, migrate, terminate (click here for more information).

You can access to the newly created VM via VNC or the ssh-protocol. The connection setup is described in the paragraph «VM access»
Connect via the SSH-protocol through the command:
Replace the«<VM IP-address or hostname>» field by IP or the hostname of your VM.
Changing the parameters of a running VM
If necessary, you can change the parameters of the created virtual machine.

Wait for the POWEROFF status (before there will the SHUTDOWN status), then click the active «Resize» button in the «Capacity» field.
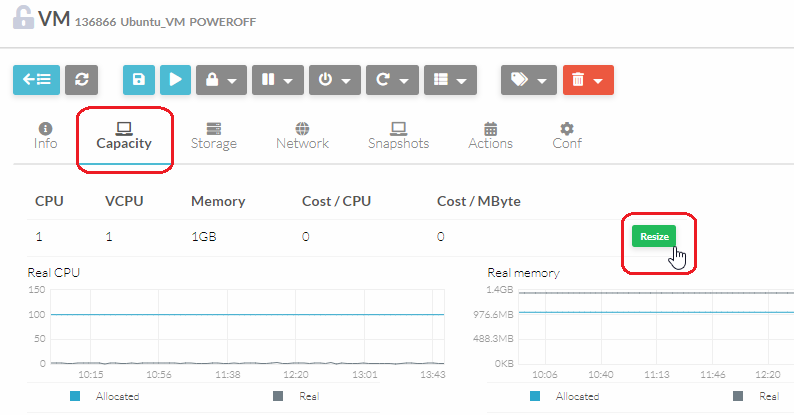
Change the required fields («Memory», «CPU», «VCPU») and click the «Resize» button.

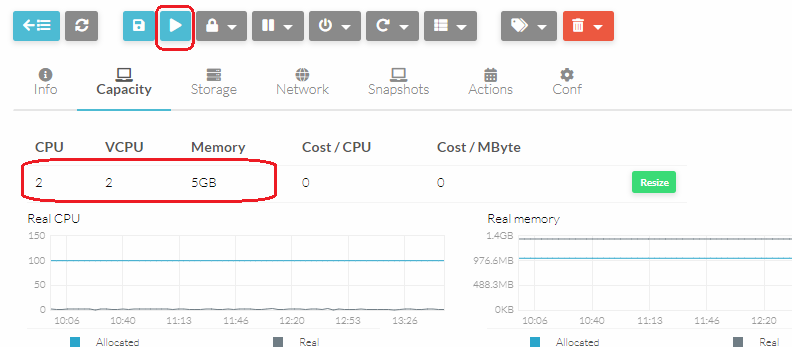
Please note that the parameters have been changed and run your VM by clicking the «RUN» button.
VM Cloning
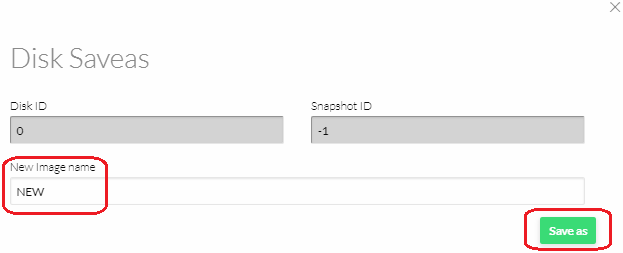
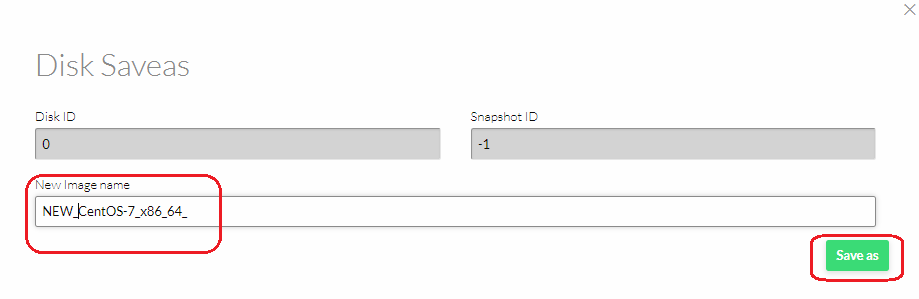
To clone a virtual machine, on the «Storage» tab, click on the «Saveas» button in the «Actions» tab.

In the opened window, set the name of a new image and click the «Save as» button.
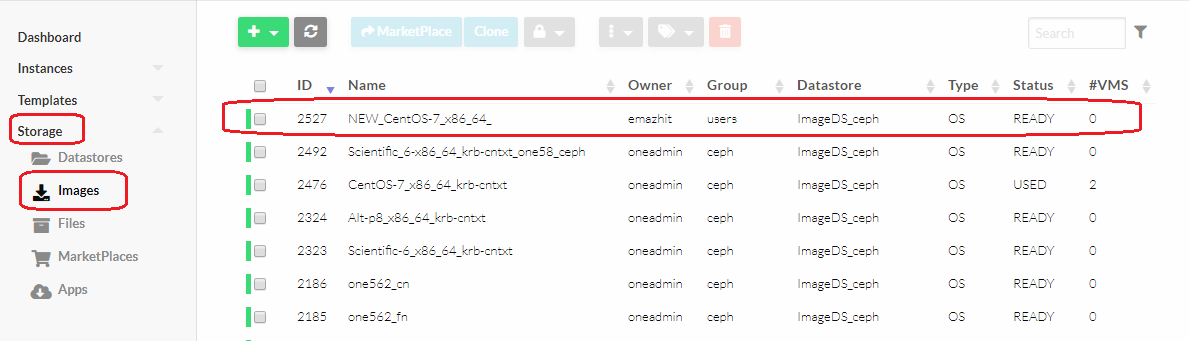
On the «Storage» → «VM Images» tab, make sure that the cloned disk has the «Ready» status.

If necessary, make it persistent (how to do it, you can read here).
Next, in the required VM template, on the «Storage» tab, select the created disk.
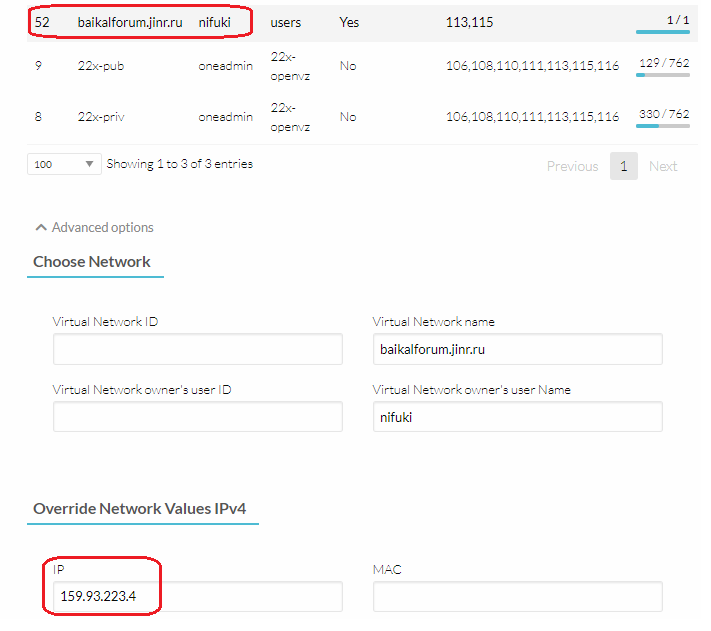
On the «Network» tab, select the virtual network 220-priv (ID: 569) or 22x_pub (ID: 9) (note that this requires free quotas for the resource selected) and click the «Update» button.

The VM will be assigned a free IP address from the shared network pool.
If you need a specific IP address from the user-reserved network (more here), you can specify it in the previous step (as in the screenshot).
After making changes to the template, you can create a virtual machine from it.
Creating a VM based on an existing template with a persistent image
To create a virtual machine template based on an existing template with a persistent image and resize this image, you need to perform the following steps:
Before creating a VM, a persistent disk should be made non-persistent (click here for more details).
When creating a VM with a non-persistent disk, specify the required disk size.
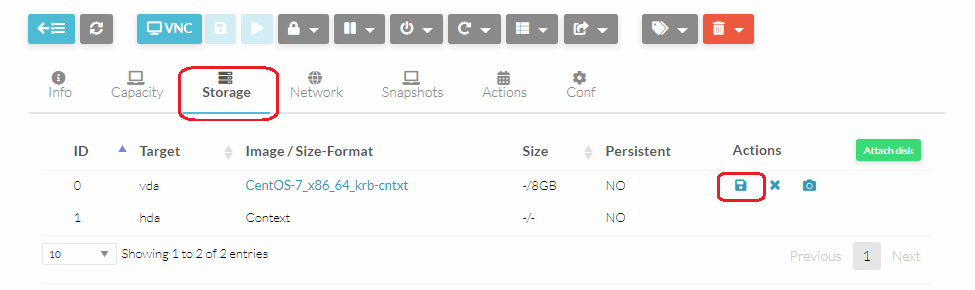
After the VM has switched to the «RUNNING» status, save the disk. To do this, select the required VM, go to the «Storage» tab, click on «Savas» in the «Actions» column (floppy disk icon)
Next, you need to make sure that the saved disk has changed the «LOCKED» status to the «READY» status and make it persistent.
On the «Storage» tab of the virtual machine, in the «Actions» column, perform the «dettach» operation (cross mark) for the «vda» disk.
Connect the saved disk and reboot the VM by performing «Reboot Hard».
Creating a VM with a pass-through GPU card (GPU capabilities inside the VM)
To use such resources, you need access to the juno-gpu cluster and the presence of images in the ceph-image storage.
To create a VM of this type, you need to specify additional parameters in the template.
To do this, create or update the existing template. After setting the VM parameters, go to the «Other» tab, in the «PCI Devices» section, click the «+» button and select an available device from the drop-down list. Next, save the template and initiate the creation of VM from it.
To check the device connection, you need to go to the VM created by ssh and using a utility, such as «pciutils», to view the connected devices.
Example for Centos:
lspci -vvv | grep NVIDIA
![]()
Specific parameters description
LOOKUP_HOSTNAME: sets the host name of the VM from DNS. Possible values: «true» or «false»
HOSTNAME: manual setting of the VM network name.
Basic operations with the disk
Persistent / non-persistent images
A persistent image can be used by only one VM. If the VM is deleted using the «Terminate» function, all data is saved to this image.
A non-persistent image can be used by multiple VMs simultaneously, but data is never written to this image after deleting the VM.
To make an image persistent/non-persistent, choose it (the tab «Images») and press the «Make persistent» or «Make non-persistent» button.
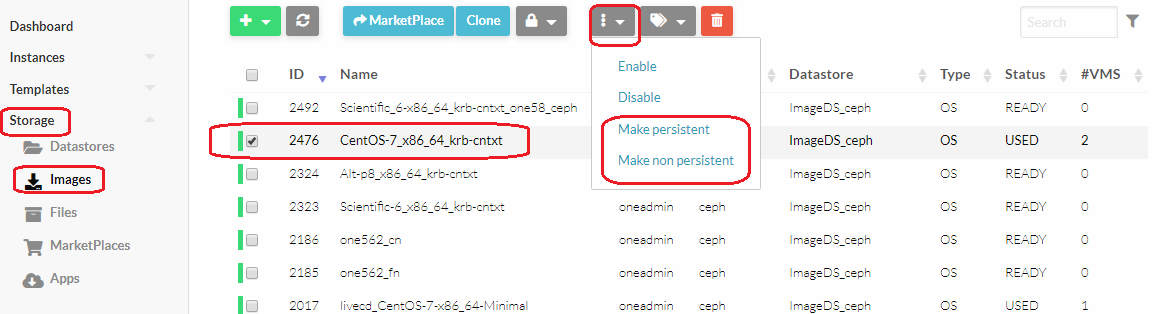
An image can have one of several statuses: «READY» - the image is not used by any VM, but is ready for use; «USED» - a non-persistent image is used by at least one VM (for other statuses and in more detail about the mentioned above, you can read the link).
Cloning images
Existing images can be cloned. It is useful when you want to make a backup of the image before modifying it, or to get a private persistent copy of the image shared by other user. Persistent images can be cloned only when they are in the «READY» state; non-persistent images can be cloned in any of the states («READY» or «USED»). To clone an image, one needs to choose it and press the «Clone» button.
Using snapshots
Functionality created for working with images allows you to save/return/delete the state of the VM. The functionality is available on the «Snapshots» tab of the «Instances» → «VMs» menu item.

Saving disk images (backup disk)
To save data on the VM disk, you can use the cloud functionality. Select the virtual machine whose disk backup you want to run.

Go to the «Storage» tab, select the desired image and click on the «Save As» button.
Specify the name of a new image and click the «Save As» button.
After performing this action, a new image will appear in the «Storage» → «Images» section. Go there.
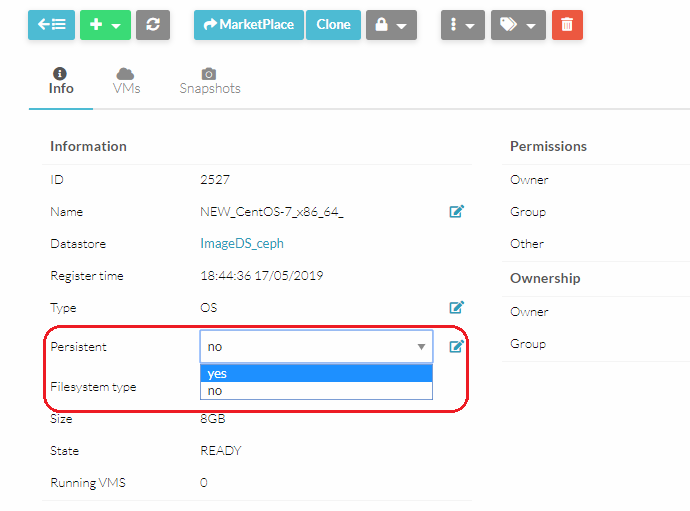
Select «yes» on the «Information» tab in the «Persistent» field.
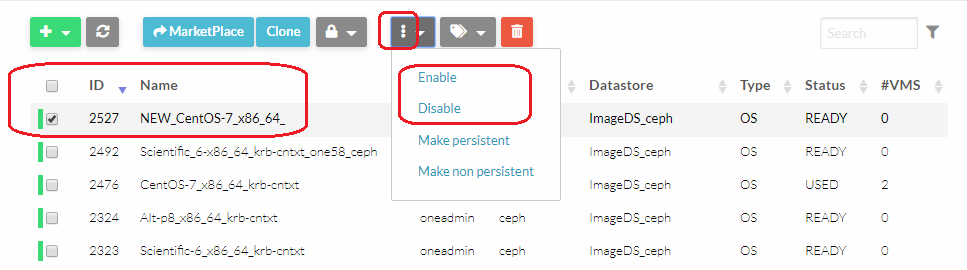
Then click «Enable».
Now you can change the previously stored (or already existing) template or create a new one using the created disk image. To do this, configure the necessary parameters in the «Templates» → «VMs» section of the «General» tab.
On the «Storage» tab, select the disk image you created.
On the «Network» tab, select the appropriate network option.
Now you can create a new virtual machine based on the template, on the disk of which there will be all the data of the original VM.
Creating and deleting a persistent DATABLOCK image.
This part of the manual describes how to create an image of the DATABLOCK type and connect it to the already running VM.
The given manual shows an example of creating an empty disk (for example, to add workspace to the VM). First, you need to create a new image, «Storage» → «Images» → «+» sign→ «Create».
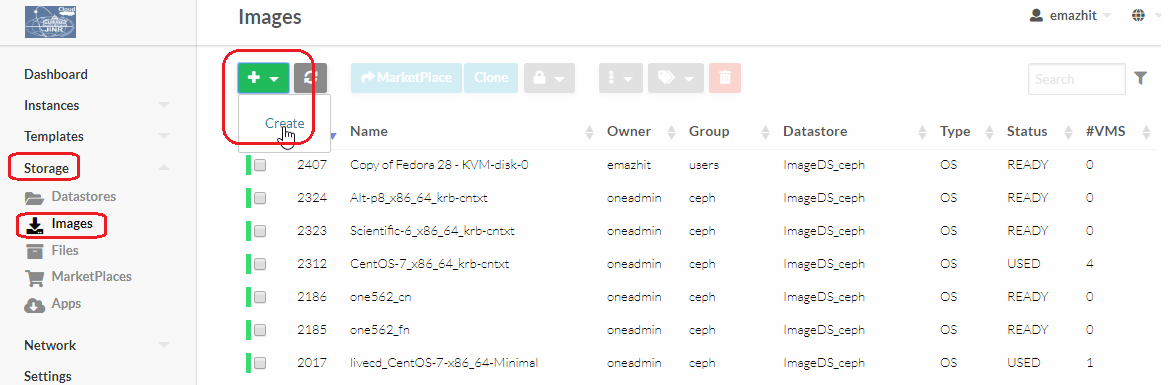
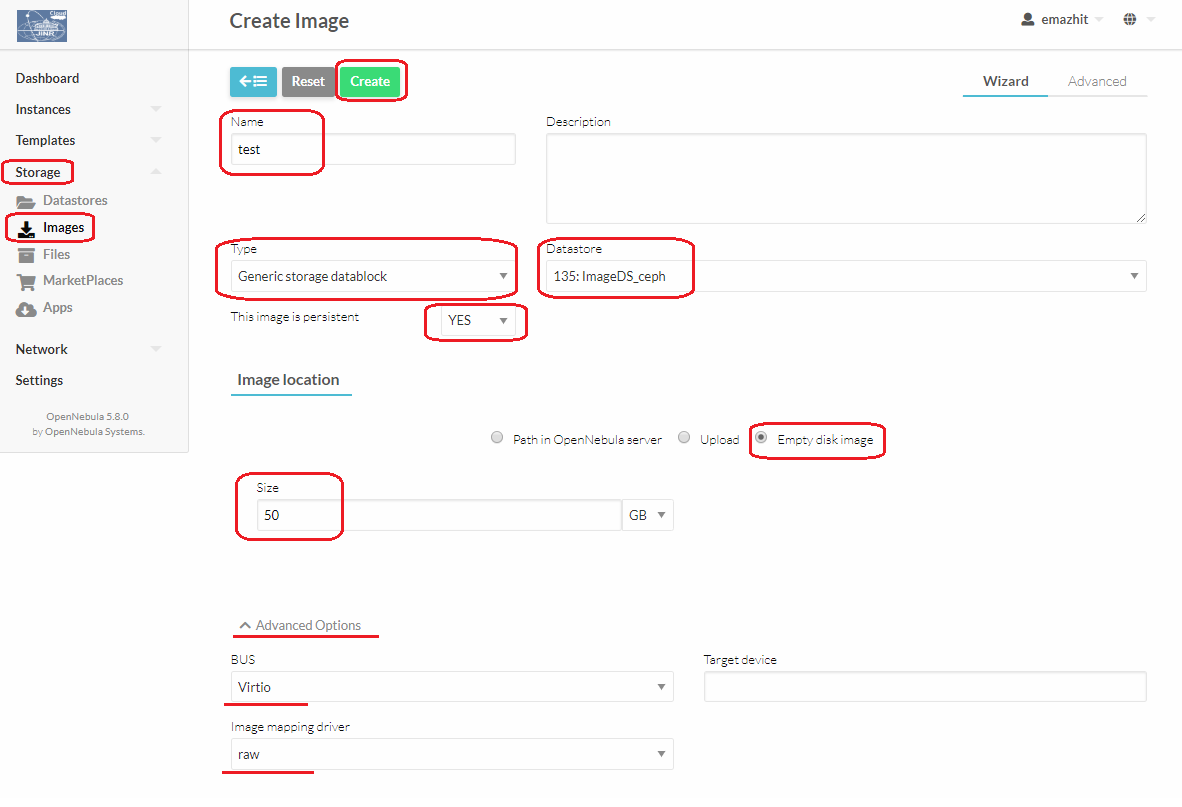
In the «Name» field, you must specify the desired image name, then in the «Type» field, select «Generic storage datablock», and as the «Datastore» storage system select «135: ImageDS_ceph».
Depending on the type of the disk being created, the «Image location» section offers different options. Since the manual considers creating an empty image, you should select the «Empty disk image» parameter and set the required disk size. Next, mark the menu item «This image is persistent» (it is necessary so that all the data that you will make is saved in this image).
The next obligatory step is to expand the menu item «Advanced Options» and select the required options and their parameters:
«bus» = «virtio», «image mapping driver» = «raw».
After completing these steps, click the «Create» button.
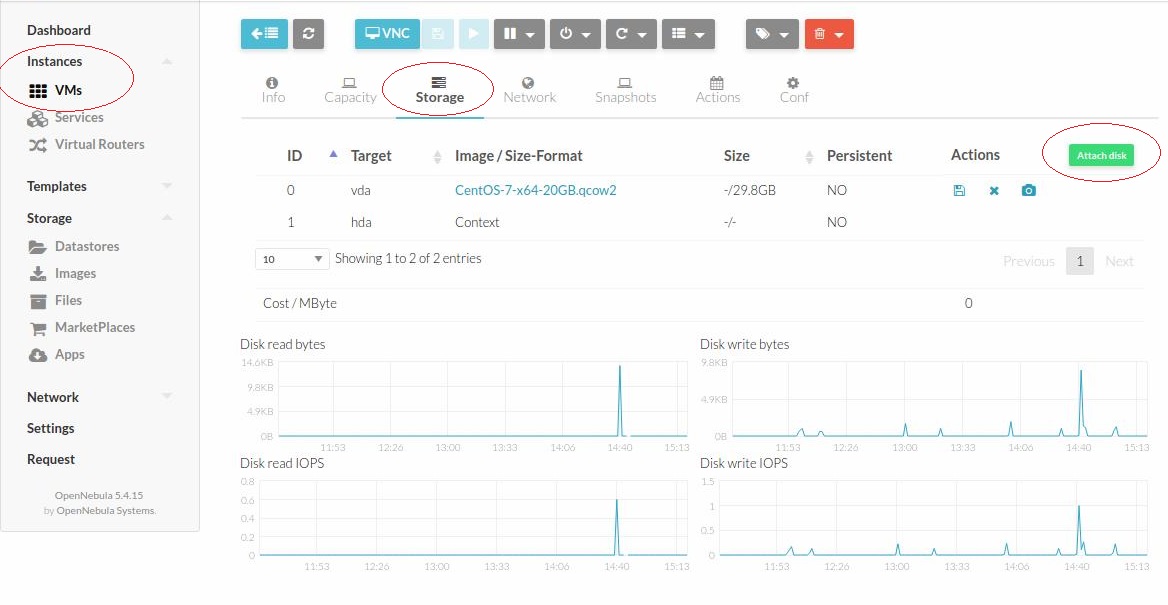
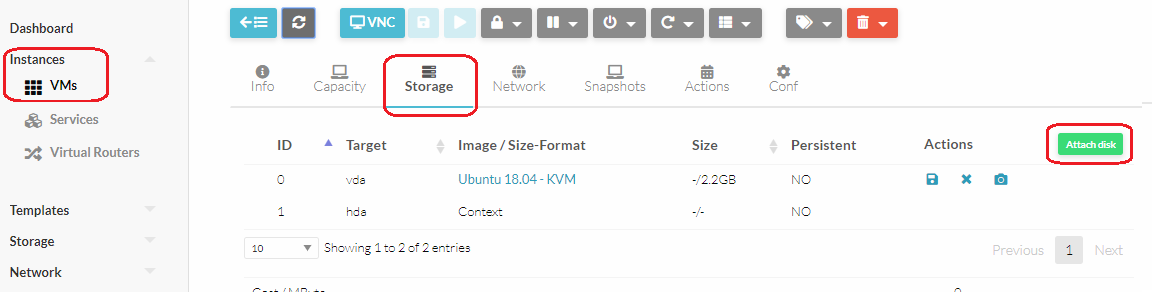
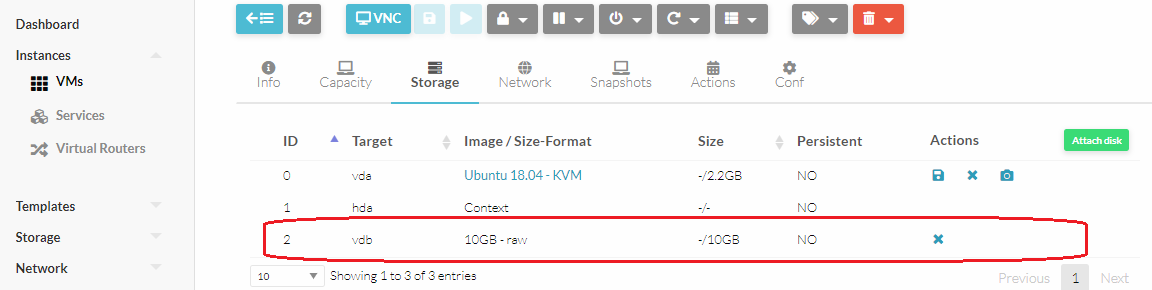
Now you can add the created image to the running VM. To do this, go to «Instances» → the «VMs» and select the VM to which the created Datablock will be added. After that, in the «Storage» menu item, you should click the «Attach disk» button and select the image you created, in the «Advanced Options» menu item select the required options and their parameters:
«bus» = «virtio»,
«cache» = «writeback» (here you can find other possible options with the explanations of they meaning),
«discard» = «unmap»,
«image mapping driver» = «raw»,
«IO policy» = «threads».
Then click the «Attach» button. After performing these actions, the created Datablock image will appear in the list as another disk.
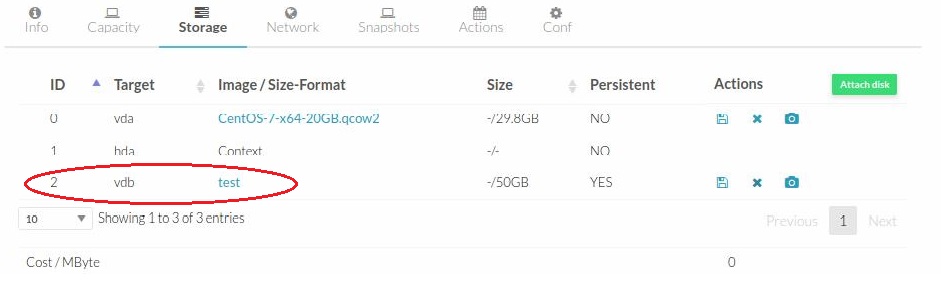
Now you can work with this image in the VM itself. To do this, you need to go to the VM and see the information about the connected disks; it will be displayed as a new disk. Then you can work with it as with a regular disk in the system: format, mount, work with data, etc.

To delete this image, you need to perform all the steps in reverse order. To begin with, so that there are no problems in our VM, it is necessary to delete all links in the system with this disk that were created and unmount the disk. Then go to «Instances» → «VMs» → « VM» → «Storage» and click on the «Detach» button.
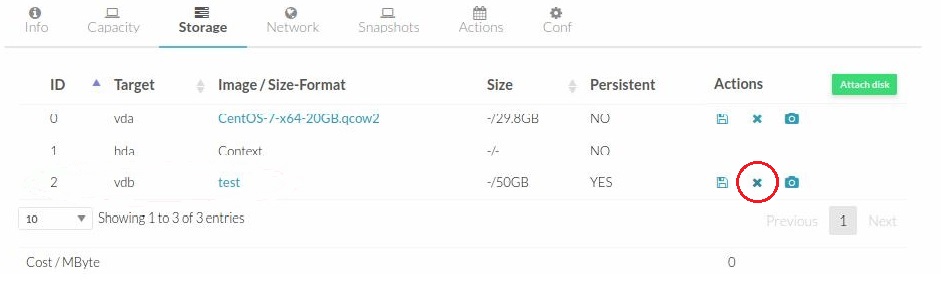
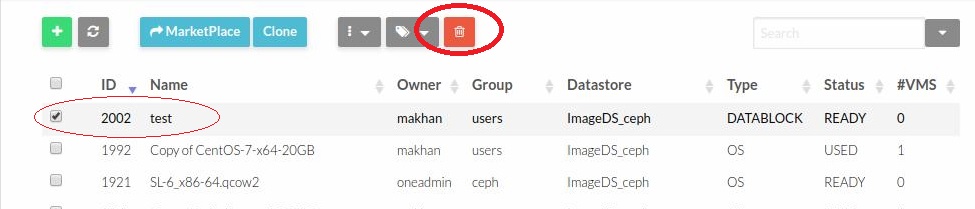
After performing the above actions, you can delete the image itself, «Storage» → «Images», select the image and click on the delete button.
Adding a volatile disk to the running VM
To add a volatile disk to the running virtual machine, go to the «Storage» tab and click the «Add disk» button.
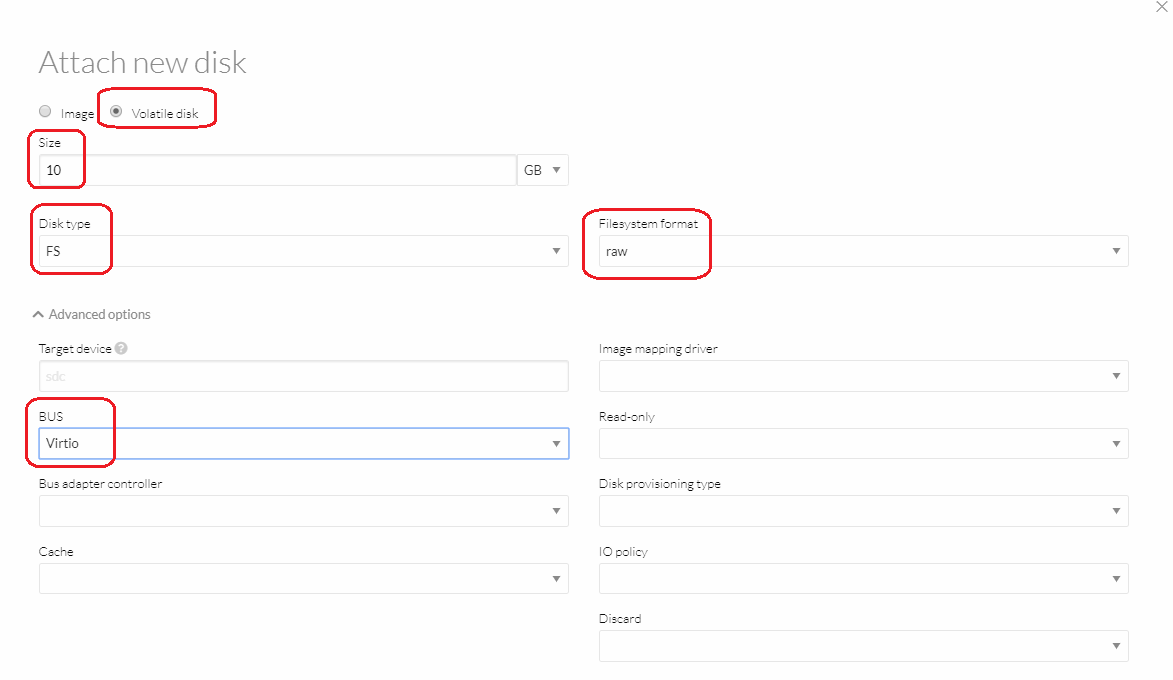
In the appeared window you need to select "Volatile disk", set the size, disk type - «FS», the file system format - «raw», in the advanced settings select the bus type - «Virtio», and click the «Attach» button. Then the created disk will be appeared in the list.
To check the disk connection, you need go to the VM as root or another user with root rights. Initially, the system displays one drive:
Filesystem Size Used Avail Use% Mounted on
/dev/sda1 41G 997M 38G 3% /
tmpfs 999M 0 999M 0% /dev/shm
...
We prepare the disk, for this we create the partition:
in the command, enter n to create the partition, then you can agree with the default settings and at the end enter w to save the settings and exit.
Format the disk:
mke2fs 1.42.13 (17-May-2015)
Creating filesystem with 18349824 4k blocks and 4587520 inodes
Filesystem UUID: 48eac5bd-31f0-433b-9b7a-fbad4ea8ebf1
Superblock backups stored on blocks:
32768, 98304, 163840, 229376, 294912, 819200, 884736, 1605632, 2654208,
4096000, 7962624, 11239424
Allocating group tables: done
Writing inode tables: done
Creating journal (32768 blocks): done
Writing superblocks and filesystem accounting information: done
Mount the disk:
Now, if you check disks in the system, both disks will be displayed:
Filesystem Size Used Avail Use% Mounted on
/dev/sda1 41G 997M 38G 3% /
tmpfs 200M 0 200M 0% /run/user/500
/dev/vdX XXXG XXXM XXXG 1% /home
...
Adding an additional network interface to the VM
To add another network interface to the VM, you need to do the following steps:
- select the VM to which an additional network interface will be added «Instances» → «VMs».
- select the «Network» tab and click the «Attach nic» button.
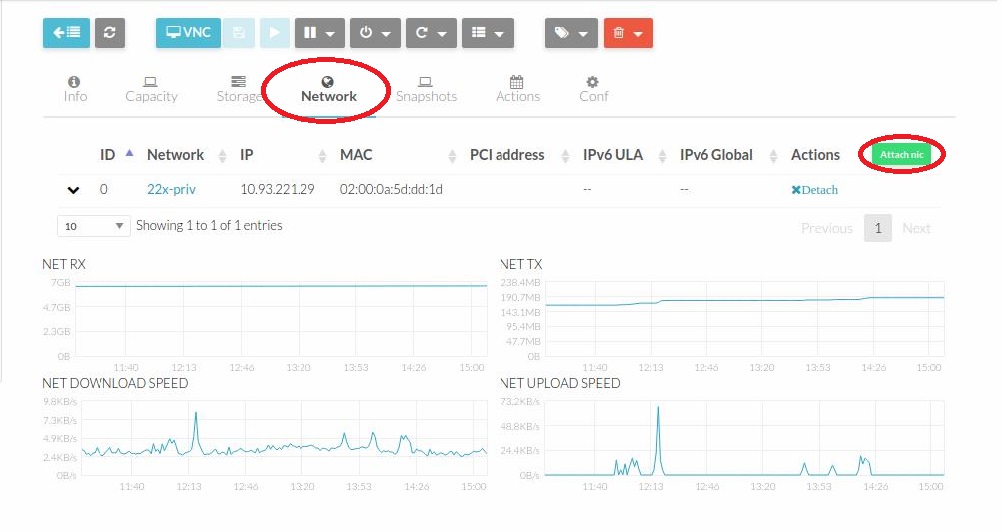
Then select the desired network and click «Attach». After that, a new interface will appear in the list of network interfaces of the VM.
In order for the interface to work, it is necessary to configure it in the VM. Below is an example of the configuration for the Linux system.
To configure the network interface in the VM, you need to connect to it via SSH or VNC. Add the table «rt2» in «/etc/iproute2/rt_tables». To do this, you can use the command «echo»
or use an editor like «Vim», «Nano». In this case, the entry is added to the end of the file and should be of the form «1 rt2».
To see what the network interface is called, you can use the commands:
or
Also after the output of these commands it will be seen if there is an IP address on the interface.
Next, you need to assign an IP address and add the route by running the following commands (the name of the interface ens7 and IP 159.93.222.222 are used for example, respectively, they will differ from those that you will have):
ip address add 159.93.222.222/32 dev ens7
ip route add 159.93.220.0/22 dev ens7 src 159.93.222.222 table rt2
ip route add default via 159.93.222.222 dev ens7 table rt2
ip rule add from 159.93.222.222/32 table rt2
sudo ip rule add to159.93.222.222/32 table rt2
In order to remove the interface from the VM, first you need to remove the IP address from the network interface:
ip addr flush dev ens7
After that, delete the interface through the web interface of the cloud infrastructure - «Instances of VM» → «VMs». In the «Network» tab, you must click on the «Detach» button on the interface to be deleted.

Creating a virtual network
To create a private network consisting of 1 or more addresses, you need perform the following steps:
Click on the network with internal (ID: 569) or external (ID: 9) addresses.
Go to the «Network» tab, select «Virtual network», select the desired network - with internal (ID: 569) or external (ID: 9) addresses. Click on «+» → «Reserve».
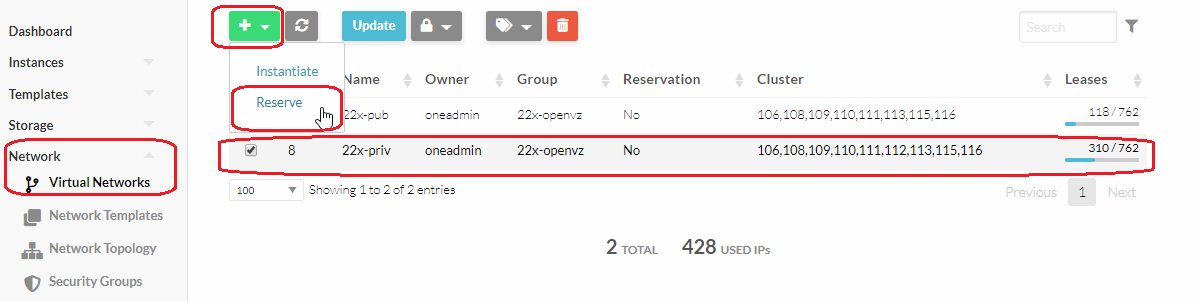
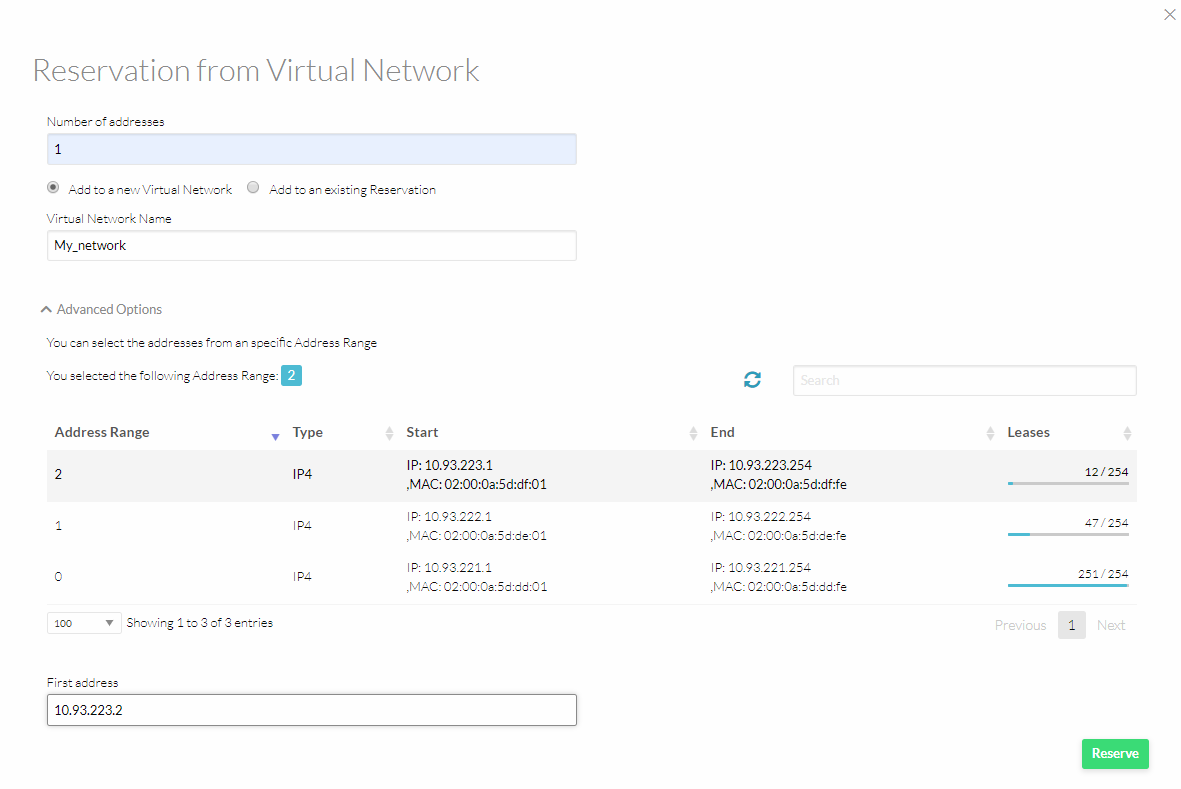
In the opened window, choose the number of reserved addresses, select «Add a new virtual network», specify the name of the network. In the «Advanced Settings», select a range from the list and specify the initial ip from the required range. Then click on the «Reserved» button.
Creating a separate subnet, even consisting of one ip-address, is useful because in this way the user can fix a specific ip-address for his host, which nullifies the probability of capturing this ip-address of another VM, for example, when the user recreates his VM.
Adding an IP-address to an existing virtual subnet
In order to expand an existing virtual subnet, select the desired network on the «Virtual Networks» tab, сlick on «+» → «Reserve».
In the opened window, click on «Add to existing reservation» and select the desired network. Next, open «Advanced Options» and explicitly specify the required ip-address in the «First address» field. Then click on the «Reserved» button.
Modification of the model of a VM network device
To modify the model of a VM network device, you need to make sure that the one-context package is installed and added to startup:
Next, in the cloud interface, go to the VM you are interested in («Instances» → «VMs»).
On the «Network» tab in the «Actions» column, delete the used interface and wait for to disappear.
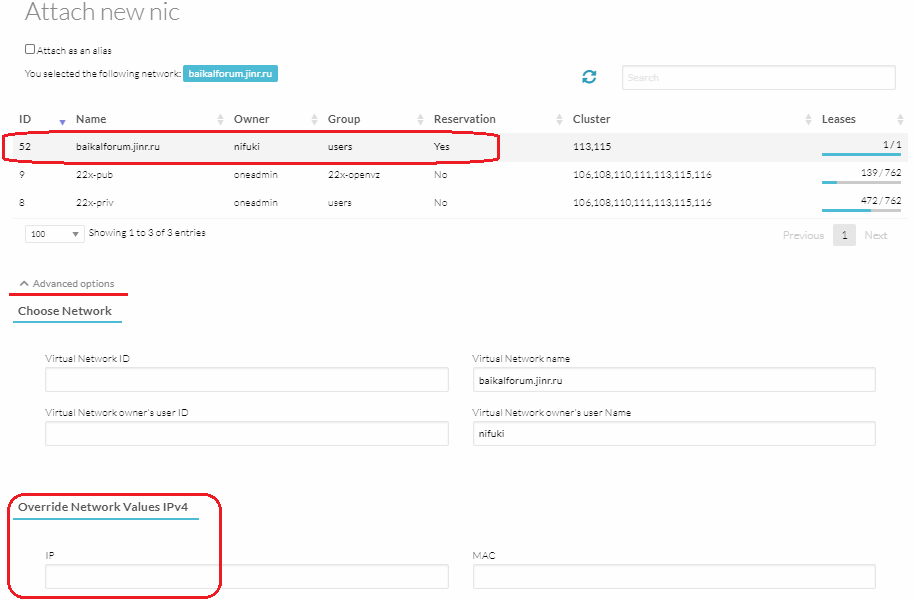
After that, click on the «Attach nic» button. In the appeared window, select the desired network.

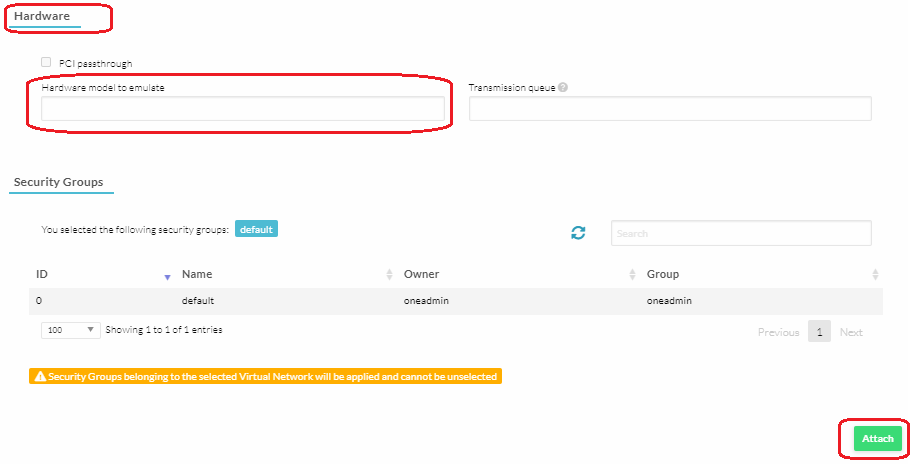
In the «Advanced options» drop-down menu, in the «Hardware» → «Hardware model to emulate» field, specify «virtio».
If a specific IP address is required, specify it in the «Override Network Values IPv4» → «IP» field. Click on the «Attach» button.
Reboot the VM if necessary.
Cloud Storage User Guide
Cloud Storage resources request
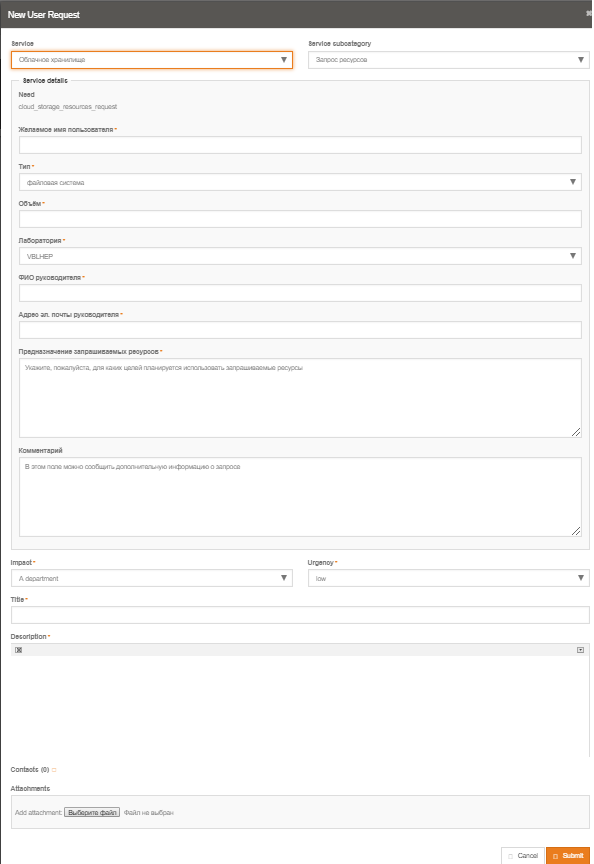
Initially a user does not have any resources. To get some resources, a user should send a resources request via a special web form « Resources request» located on the helpdesk site. To do this on helpdesk.jinr.ru, you need to fill in a resource request form (see the screenshot below) available on the following path: New query -> Cloud service -> Cloud storage -> Resources request (Новый запрос -> Облачный сервис -> Облачное хранилище -> Запрос ресурсов.).
How to use CephFS
Ceph-fuse
Add the EPEL repository
Add the ceph-repository
Install ceph-common and ceph-fuse packages
Keyring file
Create a file /etc/ceph/ceph.client.<user>.keyring with the following content:
key = <key>
Mounting
Mount manually from the command line
Mounting on boot via /etc/fstab
/etc/fstab:
/etc/ceph/ceph.conf:
mon host = 10.93.220.121,10.93.220.122,10.93.220.123
Ceph kernel mode
NOTE: You will not be able to mount cephfs in a kernel mode on the kernel older than 4.4 due to the bug (see Ceph best practices). A newer kernel needs to be installed (e.g. for CentOS 7 can be installed from ELRepo).
Installing a new kernel from ELRepo
yum --disablerepo="*" --enablerepo="elrepo-kernel" list available
yum --enablerepo=elrepo-kernel install kernel-ml
grub2-mkconfig -o /boot/grub2/grub.cfg
grep vmlinuz /boot/grub2/grub.cfg
grub2-set-default 0
Installing the ceph-common package
Install ceph-common
Keyring file
The key file must be placed somewhere with 600 rights (for example, /root/ceph.mpi.keyring) and contain only the secret text:
Mounting
Mount manually from the command line
Mounting on boot via fstab: